Thursday, May 31, 2012

Mushroom Orange Rice

Since there were so many mushrooms left, I thought the easiest thing to do would be put it in rice. I vaguely remembered this recipe and looked it up again. I got the idea to put orange juice from it, but I changed the veggies a bit. It is such an easy recipe, that any veggies can be put in it and it will still taste delicious :)

Ingredients:
1 cup cooked white rice
2 tablespoons extra-virgin olive oil
2 onions, cut into 1/2-inch dice
8 ounces button mushrooms, stems removed, cut into 1/2-inch pieces
Zest and juice of 1 orange
1 teaspoon coarse salt
1/4 teaspoon freshly ground pepper
1 cup corn
Coriander

Procedure:

Heat oil in a large saucepan over medium heat. Add onion and mushroom; cook until softened, about 10 minutes. Add corn, cook for about 5 minutes. Stir in cooked rice, zest, and juice. Season with salt and pepper. Serve warm or at room temperature.


Grilled Peaches with Mascarpone and Rosemary

I have been simply dying to try this out for more than a year, merely because the photos looked so pretty! Also, because the combination fascinated me and I was sure it was unlike anything I would have eaten before. I finally picked up peaches and ran back to the kitchen!

Ingredients

2 large ripe peaches
Olive oil for brushing peaches
About 2 ounces mascarpone cheese
Zest of 1/4 lemon
1/2 teaspoon lemon juice
1/4 teaspoon minced fresh rosemary, plus some for garnish
A few shakes of salt and freshly ground black pepper

Slice the peaches in half and discard the pits. Brush the flesh with a little bit of olive oil. Heat a grill to medium or place a grill pan over medium-high heat on the stove top. Grill for 3 to 4 minutes or until the flesh begins to caramelize and light grill marks appear.


Meanwhile, in a small bowl, combine mascarpone cheese, lemon zest, lemon juice, rosemary, and salt and pepper. Stir until combined. Divide filling evenly among the four peach halves. Serve.


Spicy Spinach Stuffed Mushrooms

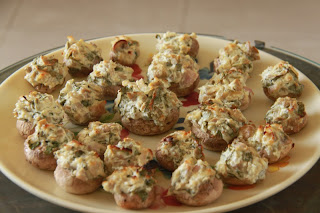
I had been wanting to try baking something which isn't a cake but never found any recipe besides pies etc, which I don't possess the equipment for. This is my first attempt and it did come out well :). Its a very easy recipe too!


Ingredients
24 ounces weight White Mushrooms (3 packets)
1 Tablespoon Olive Oil
1 Tablespoon Butter
1 whole Medium Onion, Diced
Salt And Black Pepper To Taste
8 ounces, weight Cream Cheese, Softened
1/3 cup Sour Cream
1 cup Grated Sharp Cheddar Cheese
1 package (small) Chopped Spinach

Preparation Instructions

Preheat oven to 375 degrees or 190 C

Wash and dry mushrooms. Pull the stems off the mushrooms, then chop the stems finely. Heat olive oil and butter in a skillet over medium-high heat. Add onion and chopped mushrooms stems and saute for several minutes, or until soft and starting to turn golden. Add  salt, and pepper. Stir and continue cooking for 2 minutes. Remove from heat and set aside to cool.


In a large bowl, add softened cream cheese, sour cream, grated cheeses, and the cooled mushroom/onion mixture. Fold together to combine. Add spinach, a dash of salt, a little pepper, and. Fold together until combined.


Using a spoon, mound the mixture into the stemmed mushroom caps. Use the spoon to round the mixture on top. 


Place on a baking sheet or in a baking dish and bake for 20 to 25 minutes, or until the mushrooms are cooked and the filling is hot. Serve immediately or at room temperature. Yummy!


Tequila Lime Chicken

I hadn't made any chicken thing for a really long time. I was randomly browsing around for recipes and hit upon this one...coz I love anything spicy. It was brilliant, especially the lemony kick to the chicken!


½ cups Fresh Squeezed lemon Juice (for 1/2 Cup You'll Need About 3 limes)
¼ cups Tequila
1 ounce, fluid Triple Sec (any liqueur such as Cointreau or Grand Marnier)
½ Tablespoons Olive Oil
¼ teaspoons Cumin
½ teaspoons Chili Powder
2 cloves Garlic
1 Chilli
1 whole Boneless Skinless Chicken Breast


Combine all ingredients listed (except chicken) in the bowl of a food processor. Pulse until all ingredients are finely chopped and mixture is smooth.

Pour marinade into a shallow dish and place chicken in dish to marinate for 1-2 hours. Flip the chicken breasts once about halfway through the marinade time.

Place a pan over medium high heat and sear the chicken breasts on each side. It should take about 4-5 minutes per side. Reserve excess marinade.

After both sides are golden brown, reduce heat to medium low and remove chicken from pan. Put chicken onto a cutting board and slice chicken into strips, about 1/2 inch thick.

Return chicken to pan and add the excess marinade. Stir everything to combine and let simmer for another 3-4 minutes, or until chicken is cooked all the way through.

Remove from heat and use chicken anyway you see fit!


Tuesday, May 29, 2012

Borracho Rum Cake

This is the start of another cooking spree...which is scheduled for tomorrow! I decided to make this cake in advance and strict instructions have been given to everyone in the house to not touch it until the next day. It was different from other cake recipes I saw and taken from http://www.thefoodieskitchen.com. Today I seem to be having an off day hence this is not my best effort but nevertheless, here goes!

Ingredients:

1 cup all-purpose flour
1 cup sugar
1 teaspoon baking powder
1/2 teaspoon salt
8 medium eggs, yolk and whites separated
Sugared Water:
3 cups water
2 cups sugar
1 ounce rum
1 tablespoon vanilla extract

Directions:

Preheat the oven at 325F which is approx 163 C.

Sift all dry ingredients (just one cup of sugar, leave the rest for the sugared water) and set aside.


Beat egg whites until they can hold soft peaks, then adding the egg yolks one by one.


Add the dry ingredients one tablespoon at the time, mixing well between each one.


When everything is perfectly mixed, you can pour it on a greased and floured 9″ x 13″ Baking Dish.


Bake for 30 minutes.


Pliss to excuse the burnt top of the cake; I dunno how it happened despite constant supervision...as I said I'm having an off day.

While the cake is in the oven, you can prepare the sugared water.

Boil all remaining ingredients together (except for the rum), stirring every once in a while.  I didn't add the vanilla extract either because mine is alcohol-based. Let it cool down, and add the rum.


When both the cake and the sugared water are completely cooled down, you pour a couple of spoonfuls on the cake, letting it soak. Wait from 15-20 minutes in between each spoonful so it can soak better and with consistency.

Make sure that after the cake is completely soaked, you can put it in the fridge and uncovered. It has plenty of water to keep moist.

After I took it out of the oven, I thought I had completely ruined it because it smelt like fried egg! But mother says its alright, the rum will kill the egg taste. Fingers crossed!

Sunday, May 27, 2012

Giveaway

Hey everyone, this is a friend of mine Nisha whose make up blog I follow. I share her love of make up (along with a lot of other things ;)) and she is having a giveaway! Please take a look.

http://beautyandthecheap.blogspot.in/2012/05/beauty-and-cheaps-100-follower-giveaway.html

Saturday, May 26, 2012

Mango Cinnamon Upside Down Cake

Since I'm on a mission to use up all the mangoes in the house, I hit upon the idea to make this. I used the recipe of the Pear Cardamom Upside Down Cake I posted below, replacing the pear with mango and the cardamom with cinnamon coz I'm not a big fan of cardamom. It seems to have come out better than last time, because I kept supervising it. Last time it got slightly burnt because I put it in for 40 min as prescribed but this time it got done in a little under 30 min. Will update upon the taste. Enjoy :)

Update: It's absolutely beautiful....family is literally speechless at the yumminess. Must try!


Wednesday, May 23, 2012

Mango Cheesecake

I was very excited about trying a baked cheesecake for the first time. And touchwood, it came out perfectly! I baked a plain cheesecake at first and then made a mango jelly topping and put it in the fridge to set. Now all cheesecake recipes make you bake it in a springform pan, which is basically a pan with a detachable base. Since I don't have one, I used my regular cake mould and lined it with butter paper sticking out over the edges so that I could remove it easily. Now this would obviously screw up the shape a little, but then we are going to eat it, not look at it :P.

The first thing to make is the base. For that you need
2.5 cups digestive biscuit crumbs
4 ounces or 113g of butter (melted)
2tbsp sugar

Combine the sugar with the digestive biscuit crumbs. Stir in the melted butter until moistened. Pour the mixture into a 9 inch springform pan (about 3 inches tall) and make a layer 1 inch thick. Bake for in 10 min in an oven heated to 325 F or approx 160 C.
As my cake mould is heart-shaped, it wasn't the same size, so I made the amount specified in the recipe, and ended up using it for two cakes.


To make the batter you need
4 (8oz.) packages cream cheese (approx 900g)
1.5 cups sugar
3 Tbsp flour
5 eggs
1 cup sour cream
1 Tbsp vanilla
1 Tbsp lemon juice


To make the cheesecake filling, cream the sugar, cream cheese and flour until light and fluffy. On medium low, add eggs one at a time, mixing well with each addition. On low, add sour cream, lemon juice and vanilla just until combined. Bake for about 1 hour and 15 minutes at 325.


As mine was smaller, I baked mine for only 40 min. After the cake is done, let it cool in the oven for 5-10 min and then take it out. It may crack at this point. Mine did a little. To avoid this, you can bake it in a water bath, but I didn't have a pan big enough for that so I let it be. Keep it out until it reaches room temperature.


For the mango topping, I squeezed the juice outta two mangoes, dumped half a cup of sugar and heated the pulp with a teaspoon of cornflour until the sugar dissolved. I had kept a teaspoon of gelatin in cold water for about 5 min. This I dissolved in a water bath and mixed it with the mango pulp, poured it on top of the cheesecake and let it set.

When I tried to take it out later, the baking paper tore at the sides because the topping is wet-ish. So I couldn't unmould the cake. When the time came to eat it, we just cut slices directly out of the mould. I had called a whole bunch of people for dinner and I was REALLY hoping that it would taste good....which it did finally :). I will definitely try this again and experiment with toppings and find some way to be able to present it!

Tuesday, May 22, 2012

Cream Cheese

I'm embarking on a fairly ambitious project - mango cheesecake. I had made a cheese cake looooong back; guava cheesecake if I remember correctly, but that was of the non-baked variety. So I'm nervous and excited about this!

Anyway, the point of this post is cream cheese. The recipe calls for 4 eight ounce boxes of Philadelphia cream cheese. When I went to the grocery store, I had a minor heart attack when I saw each box was 350 bucks! No way in hell could I justify spending 1400 bucks on a cheesecake! So I went and searched online for substitutes or alternate recipes and saw that it is SUPER easy to make cream cheese at home. You just have to take curd, hang it in a cloth for a few hours and that is it!


I bought a dabba of Nestle curd (400g) for 40 bucks out of which I got 150g cream cheese after hanging. My mother gave me advice saying that instead of buying curd, I should buy milk, make curd and use that because in this way, you get more curd than you would if you bought. After converting, the total amount of cream cheese I needed was approx 900g. As I already had 150g made at home, I needed to make 750g more of cream cheese. My supermom did all the calculating and concluded that I need to make curd out of 3 litres of milk. So bottom line, instead of spending 1400 bucks on the cream cheese, I am spending a little more than a 100 bucks and making it at home. Howzzat?!

Thursday, May 17, 2012

Perfect Cookies!

Well this was my first time baking cookies. I did screw up a few things, but the end result was still great! The original recipe was for choco chip cookies, but since I didn't have choco chips around, I just stirred in some chocolate instead. Next time I will try this out properly. Here is the version I made today.

Ingredients

1 3/4 cups all-purpose flour
1/2 tsp baking soda
14 tbsp unsalted butter
1/2 cup white sugar
3/4 c packed brown sugar (recipe suggests dark brown, but light brown is also acceptable)
1 tsp salt
2 tsp vanilla
1 large egg
1 large egg yolk
1 1/4 c chocolate chips (which I didn't use)
Optional: 3/4 c chopped walnuts ( I used almonds as mother insisted they MUST get over soon)


Put 10 tbsp of the butter in a medium skillet set over medium high heat. Allow the butter to melt for 2 minutes and begin to swirl it around the pan, allowing it to brown. Keep the butter moving so it doesn’t burn. Browning should take about 3 minutes and you’ll know it’s done when turns a golden brown. 


Remove the pan from the heat and use a spatula to transfer the butter to a large, heatsafe mixing bowl. Add the remaining 4 tbsp of cold butter to the melted butter, and stir gently until it is melted.


Add the white sugar, brown sugar, vanilla and salt to the butter and whisk the ingredients together. Add the egg and egg yolk and whisk again until mixture is smooth, 30 seconds. Allow the batter to rest for 3 minutes, then whisk for 30 seconds more. Do this two more times; the end result should be thick and shiny. Add the flour mixture and stir until just combined, about 1 minute. Gently stir in chocolate chips and nuts, if using.


Make each cookie with 3 tbsp of dough. Form small balls and flatten onto a tray lined with a baking sheet. Bake in an oven preheated to 190 C for about 10 minutes. 

Now this is the point where I screwed up a little. I baked the first batch for 10 minutes. When I checked it after baking, the cookies were still soft, so I thought it needed to be baked a little more and popped it in for 3 more min. Then I got scared they would burn so I just left it out to cool. Then it was perfectly fine! The second batch I baked it for 10 minutes only, but I left it in the oven for a little too long after it 'pinged', so that also got slightly messed up. So basically don't panic if your cookies are still too soft on taking out and do not leave in the oven beyond a minute after the 'ping'! 

Also, I didn't leave enough space between them so the shape also got messed up. If anyone has advice on how to make the cookies look like cookies, please let me know!

Despite the screw ups, the cookies still tasted AMAZING! Please learn from my very amateur mistakes. I will most definitely try this again and make sure I get it perfect the next time :)


Tuesday, May 15, 2012

Cheese Fondue

My mom was gifted a fondue pot last Diwali and I have been just looking for an excuse to use it! I figured that I might as well do it today as I'm on a cooking roll. The recipe is super easy!

Ingredients

3/4 cup apple cider or apple juice
3 cups grated cheddar cheese
1 tablespoon cornstarch
1/8 teaspoon pepper
1 tsp garlic paste
1 loaf French bread, cubed

Method

Now I used apple cider only because it was lying around at home. It can be substituted by milk or beer also! Also, I have no idea where to get French bread, so I decided to use the most exotic bread I could get my hands on...multi grain! The garlic paste wasn't in the original recipe but I added it, again because it was lying around at home.

Heat apple cider on a moderately high flame until it starts bubbling. Add the cheese, cornstarch and pepper and stir until it melts. Add the garlic paste and stir it in. Pour the mixture into a fondue pot and savour it :)


Mushroom Tarts


I was very apprehensive trying this out as it was the first time I was attempting to bake anything of this sort. It didn't come out exactly like it was supposed to. It was supposed to be one open tart, but my dough was too sticky so I made individual tarts which taste absolutely fine! This is a slightly complicated recipe but I'm glad I tried it and pushed my limits! I adapted the recipe from earthlydelightsblog.com. I'm giving the original recipe in my post, but as we go through I will mention the changes I made. The recipe is for two tarts, I halved the measurements and made about 12 small tarts. How you choose to do it is upto you!

There are three parts to this recipe; the tart dough, the sauce and the mushroom filling. I made the tart dough first and kept it aside and then made the sauce and finally the mushroom filling.

Tart Dough

2-1/2 cups all-purpose flour
1/4 tsp sugar
226 g Amul butter, cut into 1/2-inch cubes and chilled
About 2/3 cup ice water

Mix together the flour and sugar. Add the butter and knead until the butter is evenly distributed but still in pea size pieces.

Add all the ice water at once and knead until the dough comes together. Divide it into two discs, wrap in plastic and store in the fridge for an hour. As I mentioned earlier, I halved the recipe so I had only one ball of dough to wrap.


Béchamel sauce

1 Tbsp butter
2 Tbsp flour
1 cup milk
1 egg, beaten until frothy
6 cubes coarsely grated cheese, divided
Sale & Pepper to taste

Melt the butter over medium low heat in a saucepan. Whisk in the flour until completely incorporated. Continue whisking over medium low while the butter & flour mixture bubbles, about 3 minutes.

Heat the milk until hot, but not boiling. Pour the hot milk, a little at a time, into the mixture while whisking continually. The mixture will quickly begin to thicken. Reduce the heat to low and continue to whisk until the sauce is thickened and smooth. Mix in the grated cheese bit by bit, until completely incorporated. Season with salt & pepper to taste and remove from the heat.

Whisk a little of the hot sauce (a couple of tablespoons) into the beaten egg to temper it. Then whisk the egg mixture into the sauce and set aside.

Mushroom Filling

2 packets mushrooms
2 chopped onions
2 tbsp olive oil
1 tbsp thyme leaves
Salt and pepper to taste

Well here I omitted the onions because there just weren't any at home. Also, I used butter to saute. Thyme leaves also aren't easily available so I used McCormick's Italian seasoning. The easiest thing to add would be some oregano and paprika as there are invariably some packets lying around at home. Also, to make up for the lack of onions, I put in some garlic paste.

Saute the mushrooms and onions in the olive oil until all the liquid has evaporated. Add in the thyme leaves (or whatever you are planning to put) and salt and pepper. 

Roll out the tart dough about 10 inches wide and put 1/3rd of the mushroom filling in the centre. Spoon some sauce over it. Add a little more mushroom and cover it with sauce. Fold the edges of the dough towards the centre. Its not supposed to cover the mushroom stuffing entirely. Brush some egg wash over the folds and bake for 20 to 25 minutes in an oven preheated to 400 F or 200 C.

What I did was completely different. I made small tarts by making small circles of the dough, filling the mushroom stuffing and then closing it entirely and baking it that way. The end result was still good :)


Mango Souffle

Today it seemed like I was gonna be stuck at home all day because I have a cold which is making me so cranky that I wasn't fit for company. So I decided to go crazy cooking. My mother suggested that I use the mangoes that were lying around in the house, so I decided to make mango souffle! At the time of writing this, it is setting in the refrigerator, will update regarding taste!

Ingredients

1/2 cup Sugar
3 Eggs
3/4 cup Cream
2 tsp Gelatine
1/2 cup Mango slices, sliced into small pieces
1/2 cup Mango Puree

Method

Soak gelatin in 1/4th cup of water. 

Separate the egg yolks and whites. Add the mango puree to the yolks and sugar and heat it in a double boiler. The way to do this is fill a pan with water and heat it, and then put the vessel containing the mango mixture in the pan directly.

Dissolve the soaked gelatin in hot water and add it to the mango mixture and cool. Beat the cream and add to mixture and add the mango slices as well.

Beat the egg whites stiff and fold it into the mixture.

Put it in the fridge for two hours and then enjoy!


EDIT: It was amazing! I'm surprised at myself :)


Sunday, May 13, 2012

Cheddar Wafers


Sunday dinner at my house is always something fun as we usually go out for lunch and my mother doesn't want to work particularly hard for dinner. Today there is ragda puri on the menu. I got keedas and decided I MUST make some starter to accompany it. So I looked through the recipes I have and came up with this one. For anyone who loves cheese, these wafers are very addictive and ridiculously simple to make! I adapted this recipe from www.eatliverun.com by substituting ingredients that are easily available locally.

Ingredients

1 slab Amul butter plus 1/10th of another

2 eggs

1/4 tsp garlic paste

1/2 tsp pepper

1/2 tsp salt

1/2 cup grated sharp cheddar cheese

1 1/2 tsp baking powder

2 cups all purpose flour

Method

Preheat your oven to 350 F or approx 177 C.

Whisk together the melted butter and eggs until creamy. I took the additional step of browning the butter just for kicks! But then when you put the eggs into it, you need to keep whisking it to dissipate the heat or the eggs will cook and we don't want that happening.

Add the cheese and mix until combined. Add the baking powder, salt, pepper, garlic paste and flour and mix well.

Roll out dough onto a floured surface until it’s a little less than 1/4th inch thick. Cut out small circles with cookie cutters and place onto a parchment paper lined sheet tray.

Bake for 20 minutes, or until golden.

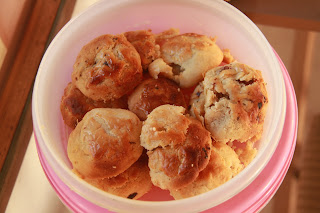
Since my oven wasn't big enough, I baked in batches of 3 which came up to approx 100 biscuits. The first batch (in the picture) disappeared within 15 minutes! No exaggerations. I also ate them with cheese because I am a firm believer in the philosophy that there is no such thing as too much cheese :)

Saturday, May 12, 2012

Pear Cardamom Upside Down Cake

So I'm finally back home and of course the first thing I had to do was bake a cake! I used to browse recipes to procrastinate during exams, so I now have a LOT of new stuff I want to try including pies and cupcakes. Unfortunately since I do not have the necessary pans etc, I just baked a cake. I was quite apprehensive about it because it was a type I had never tried before and it involved other cooking steps as well. Especially because going near the gas makes me nervous! Well the cake was made, and when I first tasted it, I didn't like it much. But after a day....in my opinion its one of the best cakes I have ever made. The cake itself was great, buttery and soft and the pear-caramel topping was yummy! This is one I will definitely try again some other time so that I can make it properly!

To make this cake, the brown sugar caramel needs to be made first.

Ingredients:

4 tablespoons of butter (approximately 3/4th of a slab of Amul butter small packet)

3/4th cup of brown sugar


I recently bought a packet of Bluebird demerara sugar for only 55 bucks. I think it was a fairly good investment, as I have many recipes which call for brown sugar and I ended up using normal sugar. Brown sugar gives a whole different flavour though! Anyway, going back to the recipe, place the butter in a pan, and keep swirling it until it just starts bubbling, which should take about 3 minutes. At this point it should be a nice brown colour. Then add the sugar and keep stirring with a wooden spatula until it melts and becomes a thick brown liquid. The butter and the caramel will seem to separate, but don't panic. After the caramel is made, immediately pour it into a cake pan lined with butter and keep it aside. Now for the cake!


Ingredients

1.5 cups all purpose flour
1 slab of Amul butter plus the 1/4th left over after making the caramel
1/2 teaspoon cardamom
1 tsp vanilla
3/4 cup granulated sugar
2 tsp baking powder
2 eggs
1/2 cup milk
2 pears


Method

Preheat the oven to 350 F or 177 C. Cut the pears into thin slices and arrange them on the caramel in the cake pan. Sprinkle a little lemon juice on them to prevent browning.

Whisk the flour, cardamom and baking powder together and set aside.

Cream the butter and sugar. Add the eggs one at a time while continuing to beat. Add the vanilla extract. Then alternately add the flour mixture and the milk and beat until light and fluffy.

Spread the cake batter over the pears and bake for 40 minutes. This is the prescribed recipe time, but since ovens can be kinda unpredictable, I suggest you keep checking every 10 minutes by peeking to see whether the cake looks done or not. Mine got slightly ruined because it baked faster than I expected.

Take the cake out when ready and let it cool for a few minutes. Then hope for the best and turn the pan upside down and unmould the cake on to a nice plate and admire your creation!